


Taking advantage of Sitecore’s Customer Data Platform (CDP), along with the personalization benefits that come with Sitecore Personalize, is an obvious boon to any marketer. Using Google Tag Manager to integrate Sitecore CDP and Personalize creates a unified view of your customers across all channels and enacts decision models to automate next-best actions based on your organization’s knowledge or predictive analytics. Traditionally, this type of system is integrated into a website, mobile app, or other connected experiences via tight-knit integrations with the development team.
However, many mature organizations take advantage of tag management systems, such as Google Tag Manager, to deploy code snippets for everything from eCommerce tracking to heatmapping tools and can also be used to integrate with Sitecore CDP. Sitecore recently released their Engage Javascript Library SDK documentation, which makes this integration even easier than before. I’ll walk through an example of how to set up Google Tag Manager to take advantage of the flexibility of a tag management system while populating a customer’s data profile with relevant information, as well as delivering personalized experiences to that same data profile.
Advantages and Disadvantages of Using a Tag Management System Like Google Tag Manager
Let’s talk about some of the advantages and disadvantages of using Google Tag Manager to integrate Sitecore CDP and Personalize (or any tag management system) to initialize the Engage JavaScript Library (or SDK).
Advantages of a Tag Management System
-
Flexible tagging structure means that changes and additions to take advantage of Sitecore CDP and Personalize are quick, easy, and may not require a developer (though it’s always a good idea to walk them through any changes you make).
-
No deployments, as all code is deployed through Google Tag Manager. This means less reliance on developers' time and more time testing! Did I mention testing changes are fast and easy?
-
It is easier to tie Engage events to already-existing triggers and variables, such as eCommerce actions and transaction details.
A lot of the power you get from using a tag manager for other things (such as Google Analytics) also makes it powerful for using with Sitecore CDP and Personalize. I cannot stress enough just how much flexibility you get deploying the Engage JavaScript Library via this method. But, it’s not all upsides.
Disadvantages of a Tag Management System
-
Users who use adblockers to block Google Tag Manager block the entirety of your integration.
-
Load times for external content from Personalize is slightly slower overall than direct integration with the codebase.
-
There is a slight delay with browsers displaying Experiences if using Sitecore Personalize. This is because they won’t get rendered until the tag management system deploys the Engage JavaScript Library. While this all happens relatively quickly, it can still cause this “pop-in” effect to occur when using specific Experience content templates.
Some of these challenges, including the first and biggest one, can be resolved via server-side tracking, which we won’t cover today. The reality is that tag management systems will never be quite as fast as something integrated directly alongside your website or app’s codebase, but provide ultimate flexibility and speed for getting Sitecore CDP and Personalize up and running on your site.
Getting Started Using Google Tag Manager to Integrate Sitecore CDP and Personalize
As always, your best reference for integrating the Engage JavaScript Library via Google Tag Manager is to refer to Sitecore Documentation that specifically walks through this process. Be sure to read through that whole section to understand how to start initializing the tracking script. Finally, Google Tag Manager’s JavaScript support excludes some things that you may commonly see included in custom JavaScript code online, including support for things such as arrow functions, const, async, and so on. You may need to modify any code snippets that contain these features. We’ll review some of the ones that I’ve come across in Sitecore CDP documentation that need to be modified in a later blog post.
To start, you want to create a tag that initializes the Engage JavaScript Library, as well as sends the VIEW event back to CDP to understand the pages, or screens a user visits, on your site. This is how my tag is structured:
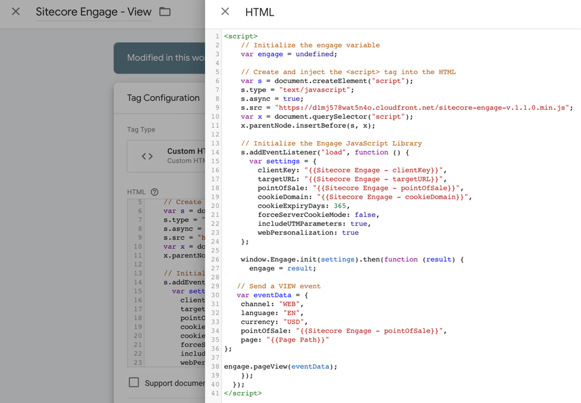
This code snippet is nearly identical to the one in the documentation. The top part of the code is loading the Engage JavaScript Library, which lets us begin to push events into Sitecore CDP. The code that is initializing and populating the settings object is populating information about your CDP instance to be sure that any further events on your site are sent to the right location, with the right settings that we specify. Finally, we see the event Data object being set with attributes that are required for the VIEW event to be processed correctly by CDP, including the page the user viewed being dynamically set using the built-in Page Path variable.
Notice how we’ve been able to designate key attribute values, such as the clientKey and pointOfSale, as variables within Google Tag Manager. Keep in mind that the clientKey, targetURL, pointOfSale, and cookieDomain attributes will be different for each CDP setup. Be sure to follow the instructions in the documentation to set these attributes appropriately. Lastly, webPersonalization should only be set to true if you have Sitecore Personalize. Otherwise, set it to false.
If we need to change our clientKey, or the user moves to a different eCommerce site of ours and we need to change the pointOfSale, this is easily done by changing the clientKey variable manually, and using a Regex Lookup table, as I’ve done below.
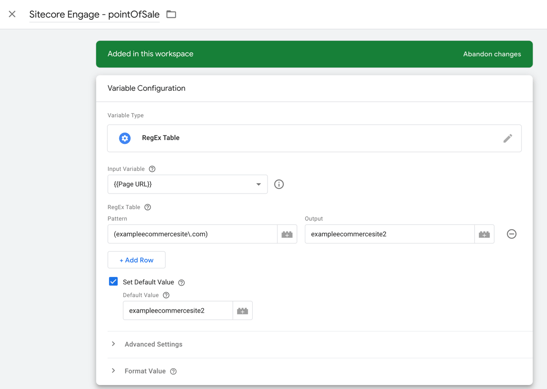
Now, adding new Point of Sales can be easily reflected throughout all our tags that call the pointOfSale attribute, so long as we use this variable.
Finally, we need to fire our VIEW event tag using a trigger. Sitecore tells us to fire this script via the DOM Ready trigger. Since we want this to fire on each pageview, we’ll use the DOM Ready trigger, set to fire on all DOM Ready events, to fire our tag.
Now, when we publish our Google Tag Manager container, we're doing a few things, all of which can be seen in Chrome Developer tools.
-
We initialized our session, and if we don’t already have one, then we receive a unique browserID (bid) value from Sitecore CDP in the form of a cookie. This ensures that even if we end the session and return, as long as we are still cookied, Sitecore CDP recognizes us as the previous user, and all of our previous session actions are assigned to us.
%20value%20from%20Sitecore%20CDP.png?width=702&height=313&name=unique%20browserID%20(bid)%20value%20from%20Sitecore%20CDP.png)
-
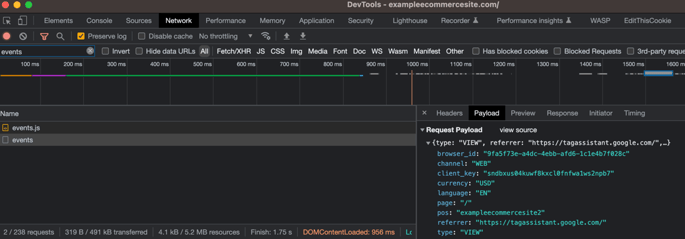
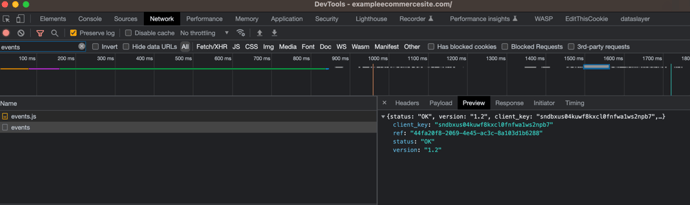
We send a VIEW event that is processed with Sitecore CDP. If our VIEW event is formatted correctly, contains all required attributes, and is accepted by the system, then we see an “OK” response from the server under the Network tab for the “events” request using the “Preview” tab. Note that we can also see exactly how our request was formatted and sent under the Payload tab, which is useful for debugging Engage functions.
-
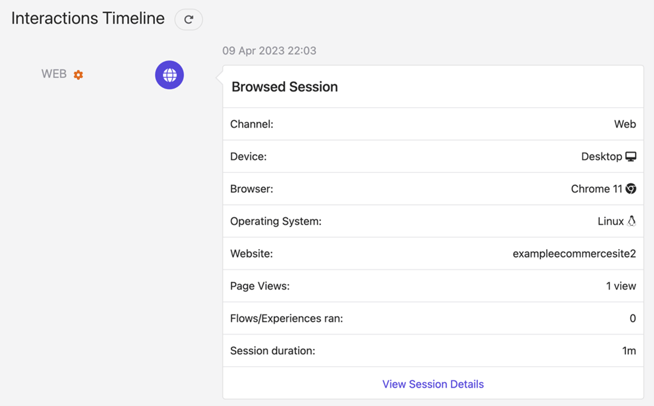
The session data for the visitor in Sitecore CDP is updated with the VIEW event for the page specified in the event. Additional events will continue to be added to the user’s session until after a set period of inactivity, defined by the Timeout attribute under the associated Point of Sale settings in Sitecore CDP.
And that’s it! You’ve successfully sent your first event to CDP from Google Tag Manager. Sitecore's CDP, or Customer Data Platform is one of MarTech’s most powerful tools. By bringing together multiple data sets and creating a single customer view, the CDP shapes highly personalized digital interactions that are delivered to the right person, on the right device, at precisely the right time.
RDA's years of experience building and integrating with digital experience platforms means your CDP solution best matches your business requirements and makes full use of your investments. Get in touch to see how we can help!